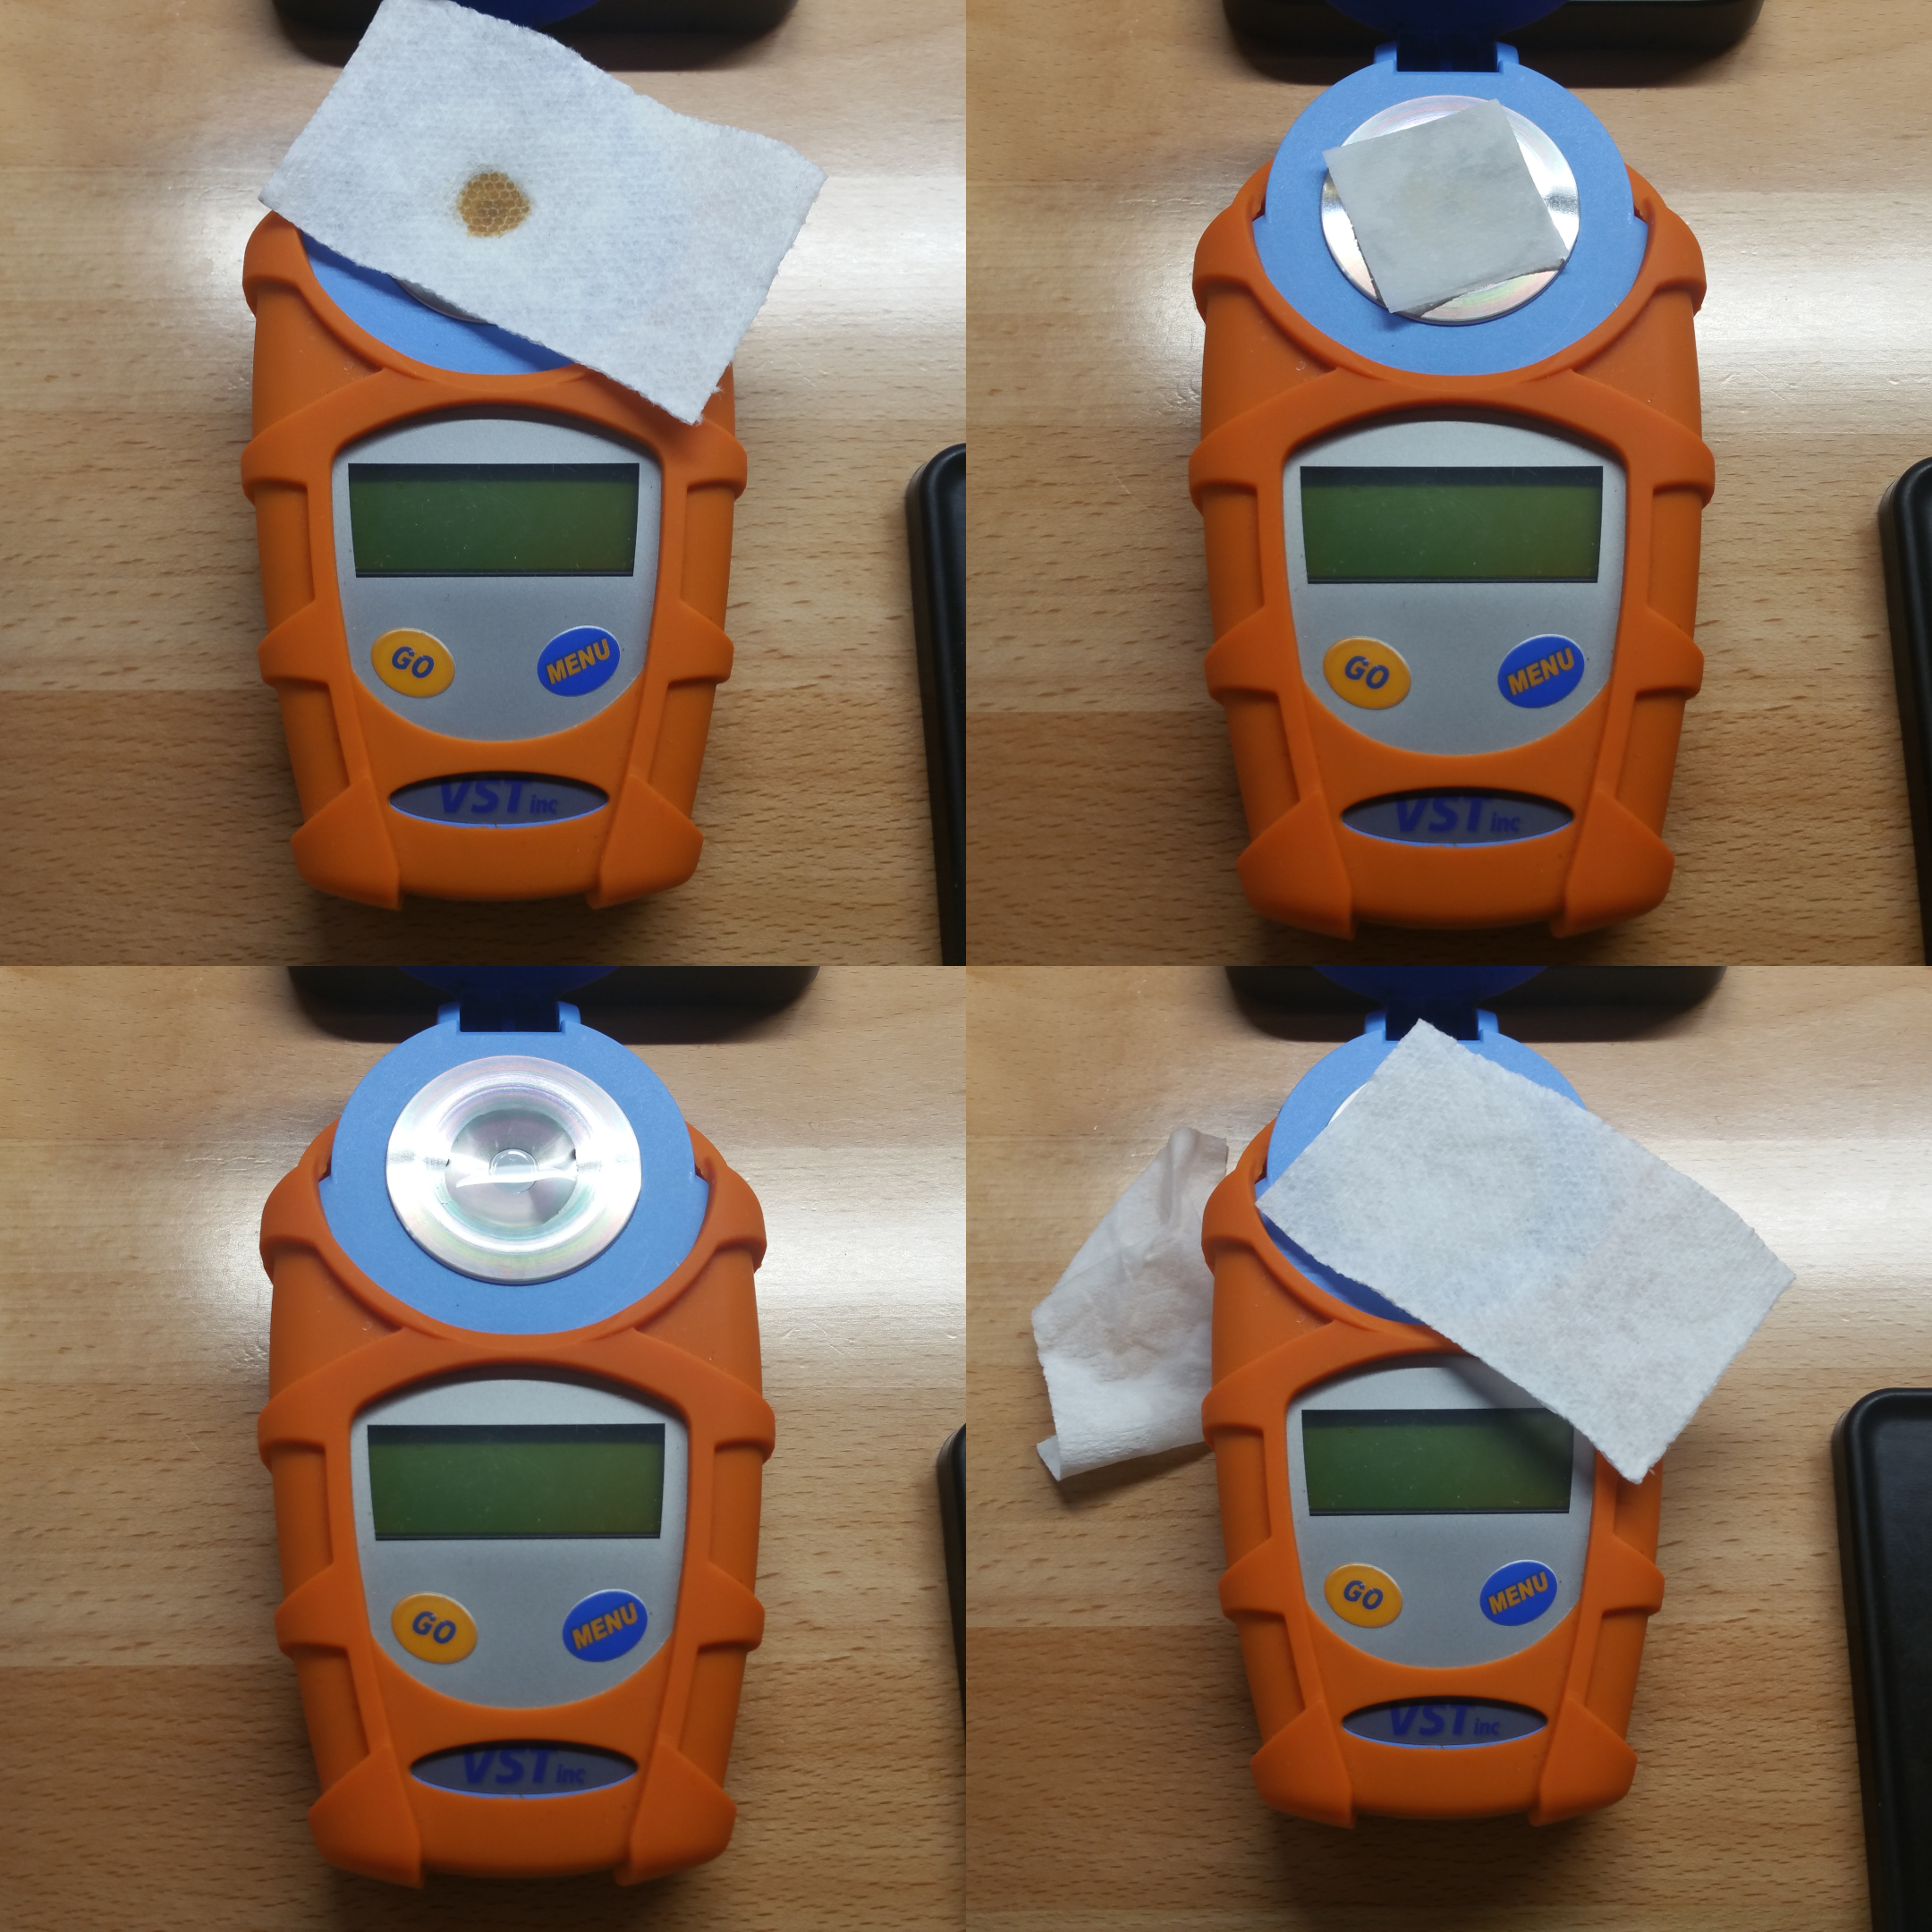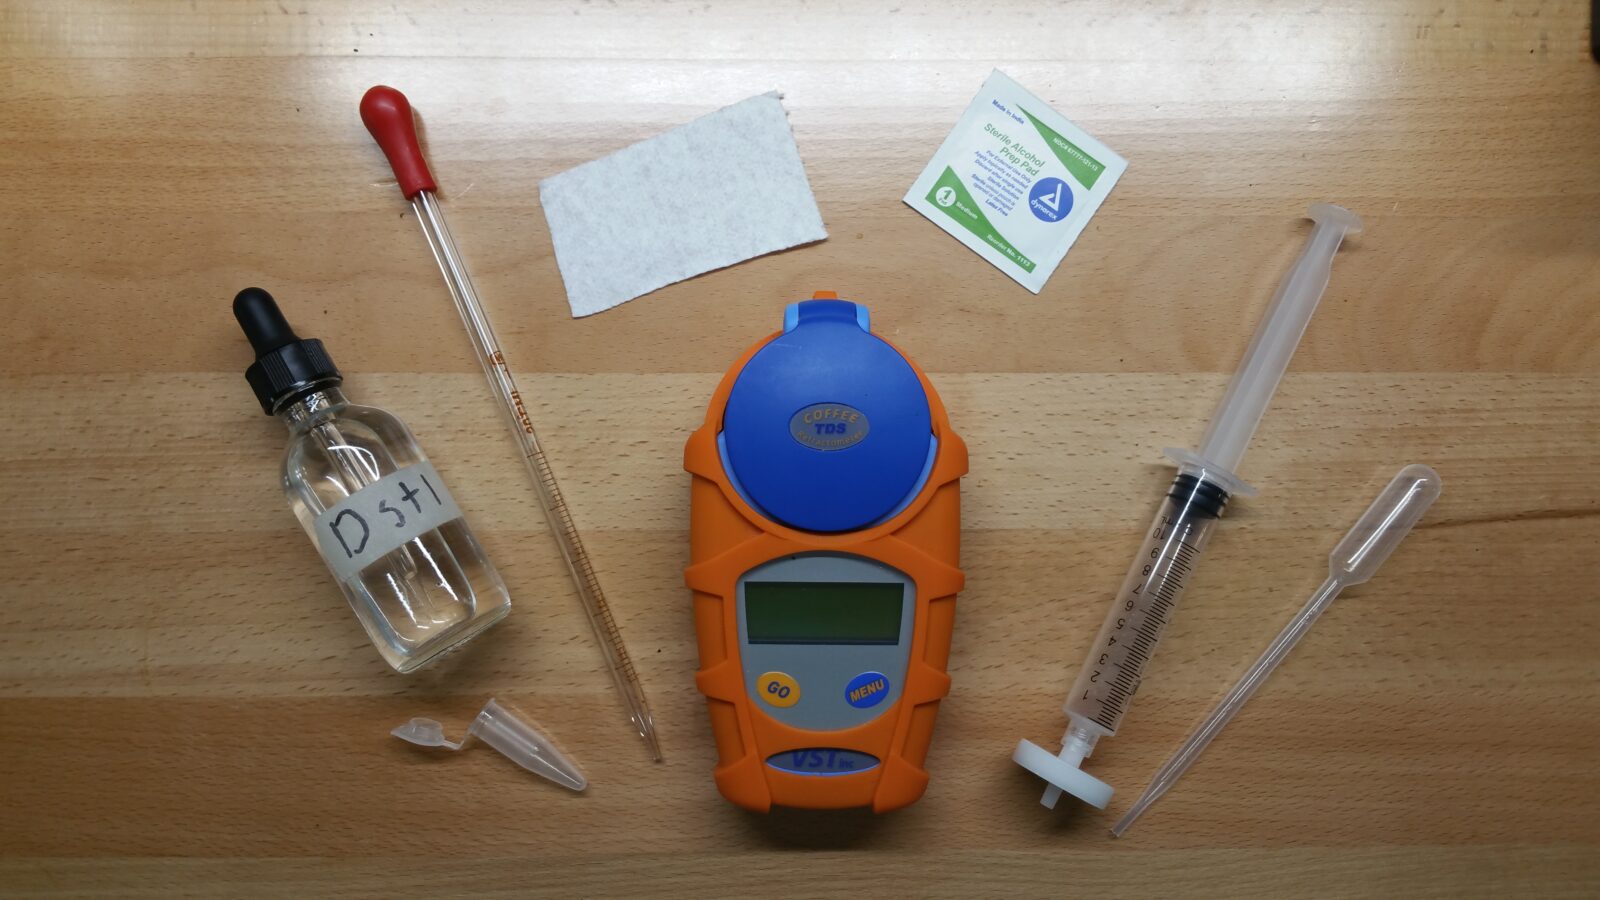
This guide is inspired by an Instagram post on how to properly measure coffee concentration with a refractometer from Scott Rao and draws many of its steps from there. It is meant to apply these same principles, an improvement over the user manual steps, in a more in-depth way for users who may be entirely new to using a refractometer.
Supplies
Refractometer
You’re going to need a refractometer to quickly and easily measure TDS to calculated extraction. I use a VST Coffee Lab III now, and have used an Atago in the past.
There are other (much slower) ways like drying ovens, but if you already have one laying around you probably know how to use it.
Pipettes
You can use disposable plastic pipettes or reusable glass pipettes. I personally use glass pipettes which I clean and then rinse with distilled water after use. I encourage you to do the same if at all possible, to reduce plastic waste.
Syringes
If you’re measuring coffee that needs a filter (keep reading to see if you do), you may need a syringe that allows for a screw in attachment. You can rinse and reuse these several times at least.
Filtration
Coffees that do not use paper filters in brewing need filtering for precise measurements. (And no, skipping filters does not tell you total content, it just gives you a bad TDS reading.)
You can use VST syringe filters, or alternatively run the coffee through a centrifuge. You might consider getting one if you measure coffee that needs filtering frequently enough that the VST filters are unsustainably expensive.
Cleaning
For cleaning the refractometer and associated tools, you’ll need alcohol wipes, soft paper towels (I use Viva for softness and pre-cut mine into small squares beforehand to make the most out of them) or microfiber towels, and distilled water for cleaning.
Before Measurement
Refractometer Prep
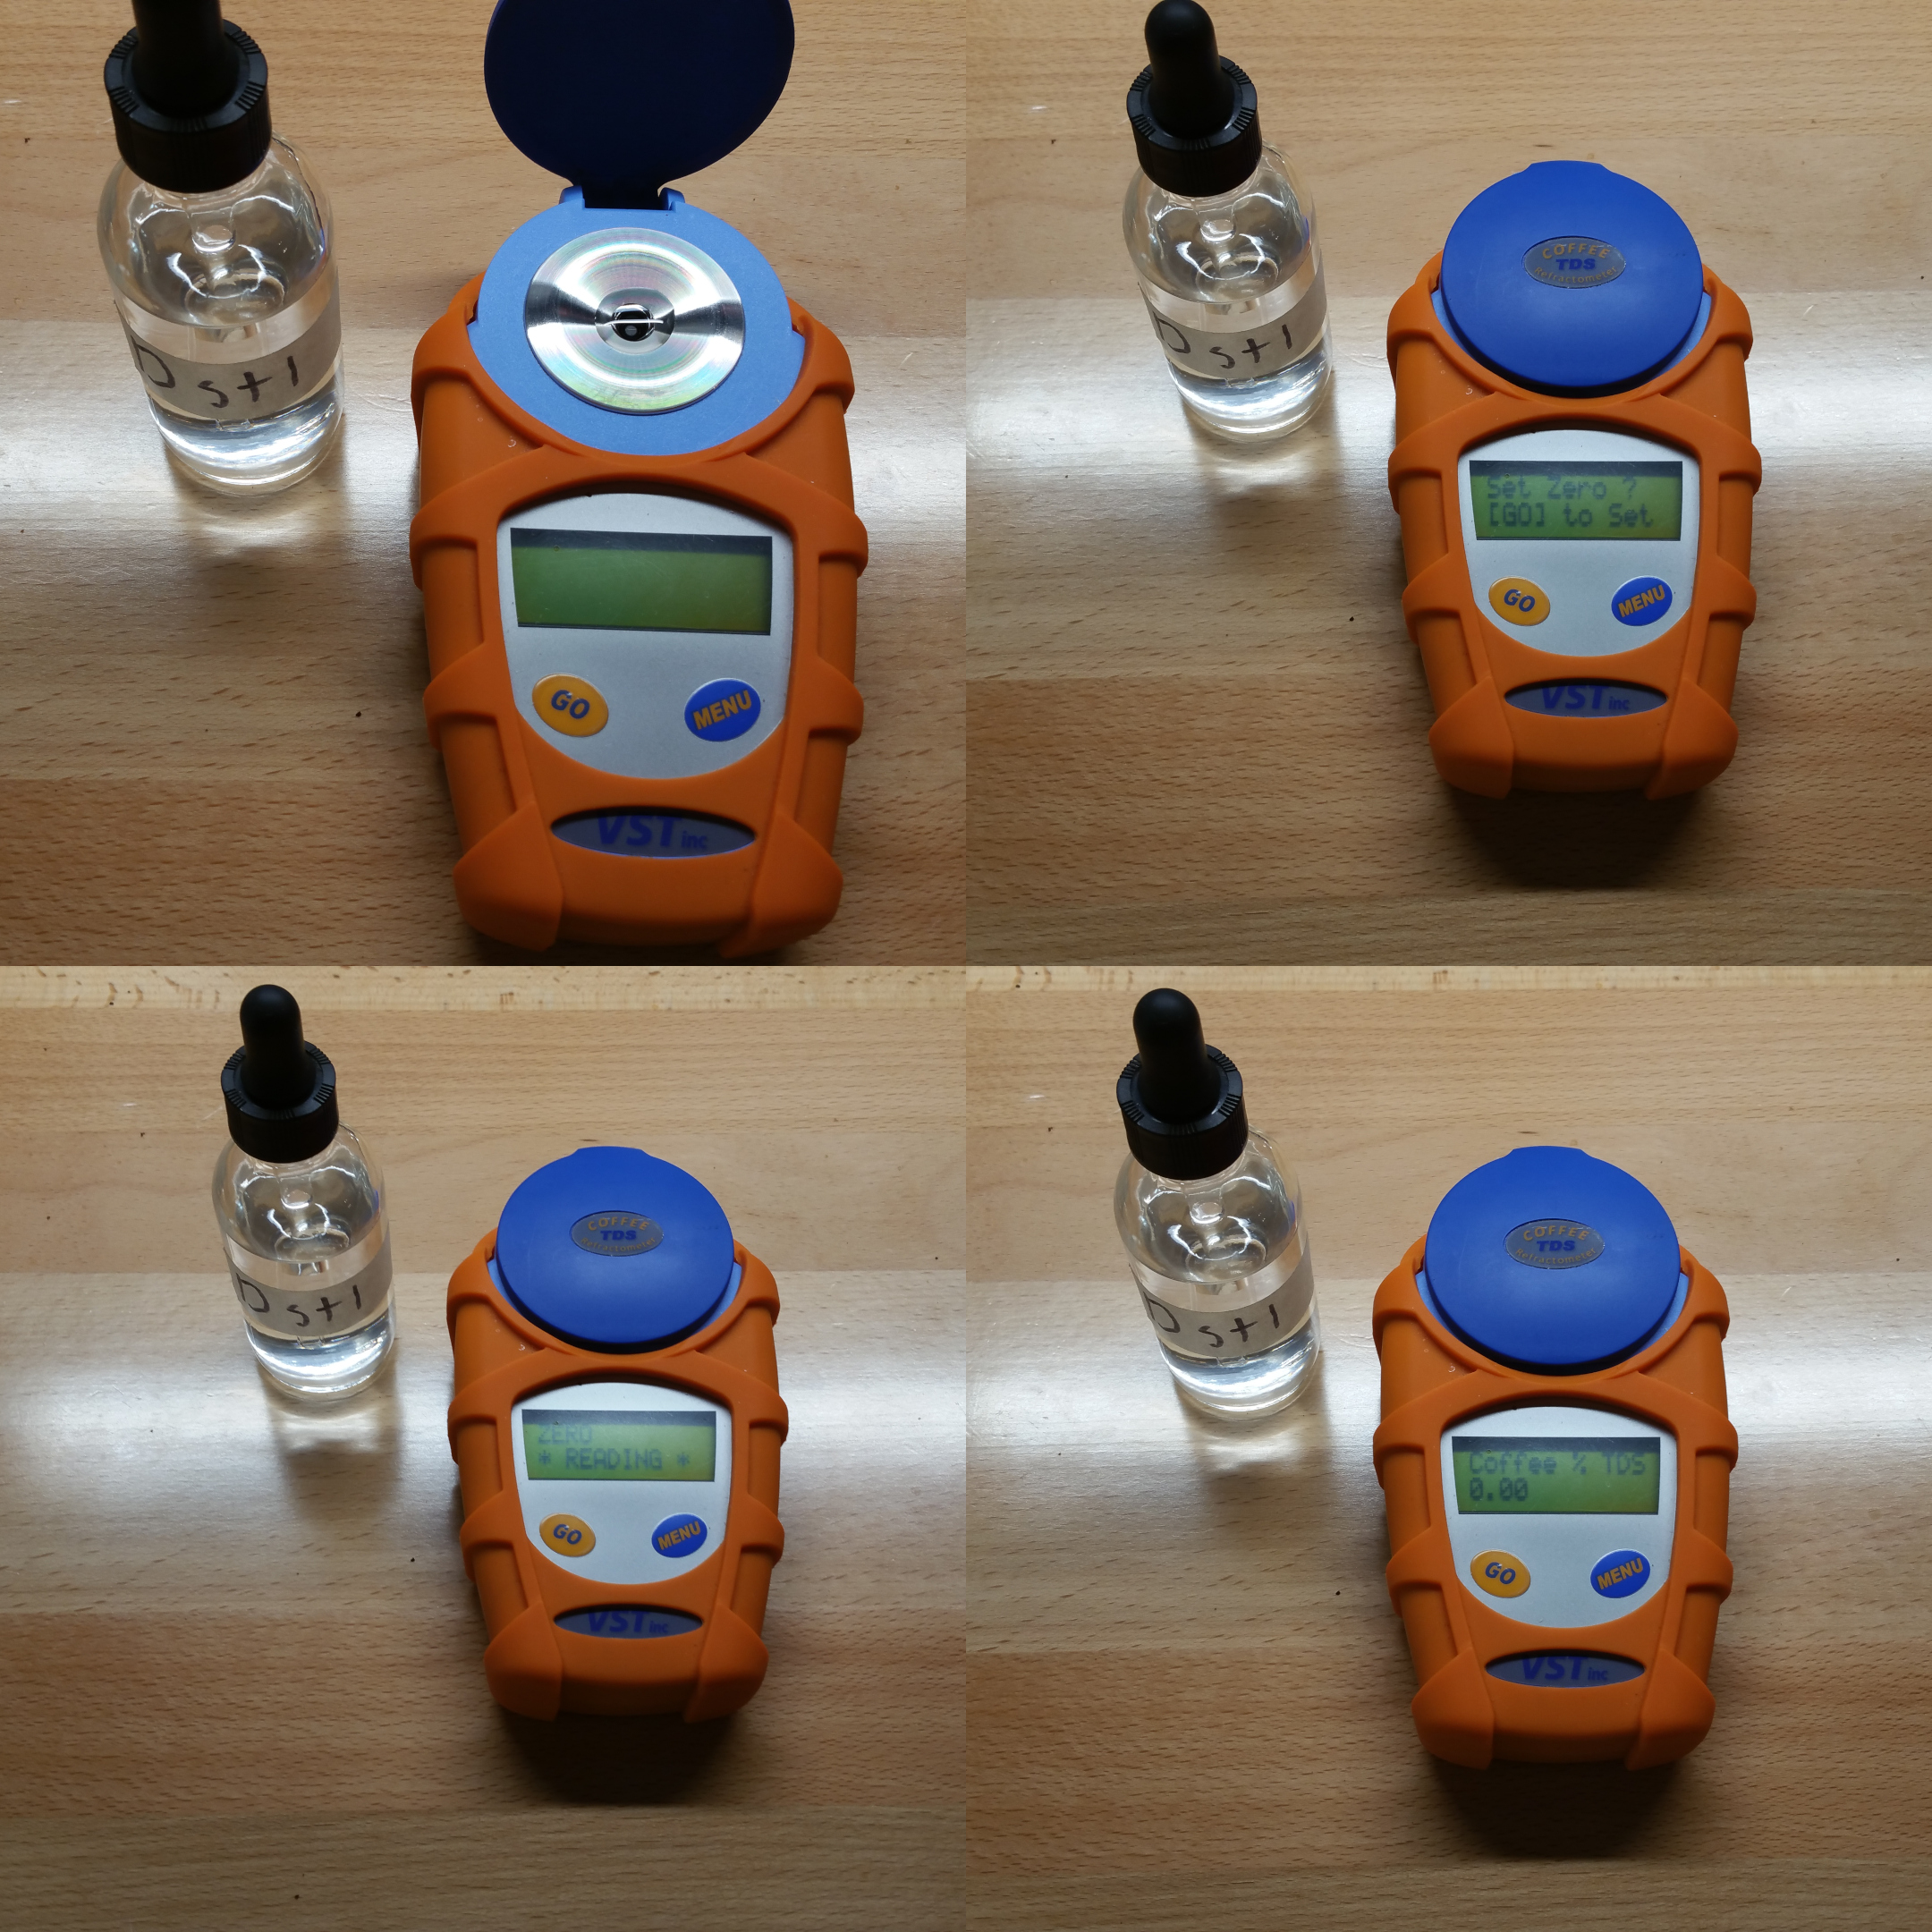
Zero your refractometer with distilled water. Do not use brewing water, RO water, or any other water. A gallon of distilled water is not expensive and will last a very long time if you’re only using it for this purpose. I keep some in a glass eyedropper bottle for easy use.
Make sure the water is close in temperature to the refractometer, within ~5°C, and both are within ~5°C of room temperature.
After doing this, dry the lens with your paper towel or microfiber towel.
Other Data You’ll Need
Make sure you have the following data recorded, you’ll need it for calculating extraction later.
Dose: The amount of dry coffee used to brew your coffee.
Brew Mass: The measured weight of the liquid that ended up in your cup or carafe. To get this with pourover type methods you can use two scales for brewing, decant into a separate measuring cup after brewing, or record a tare weight to subtract your carafe away later. But this does need to be directly measured.
Total Water: The total amount of water you added during the brew.
Unfiltered Measurement
When do I use this?
If your brew is a standard drip style brew that goes through a paper filter, you generally do not need to filter it before measuring. Some other styles of paper filtered methods like Aeropress or Syphon, however, do generally need filtered.
You can double check by filtering one sample and not filtering another, if they match, the filter is unnecessary.
Using Unfiltered Measurement
- Vigorously stir the coffee, you can use a dedicated stirring stick/spoon or the sampling instrument.
- Draw coffee into the pipette.
- Push just a few drops worth of your sample onto the lens of the refractometer and close the lid. Using just a few drops lets the sample cool faster so it doesn’t take as long to get a reading and doesn’t need an intermediate cup stage to cool it. Using more doesn’t make it any more or less accurate, just makes it take longer.
- Wait ~10-20 seconds before taking your first reading in order to let the coffee cool to the temperature of the refractometer.
- Take readings until the number stays constant every time you take a new one. This can take a few tries, you want it to stay the same for 5+ readings.
- Once it’s stable, that’s your TDS. Do not take an average of several readings, the others are just the refractometer equalizing in temperature. The stable number is the one you want.
Filtered Measurement
When do I use this?
If your brew does not go through a paper filter, it needs to be filtered before you measure it. There are also some paper filter methods that need it like Aeropress or Syphon, possibly because of something with the filters, the forces applied, or if the coffee bed can act as a filtration medium.
You can double check by filtering one sample and not filtering another, if they do not match, the filter is necessary. If you do require a filter, you have a couple of options.
Syringe Filters
Why Syringe Filters?
- Effective at ensuring precise readings.
- Industry standard.
- No extra equipment.
- Fast readings.
Using Syringe Filters
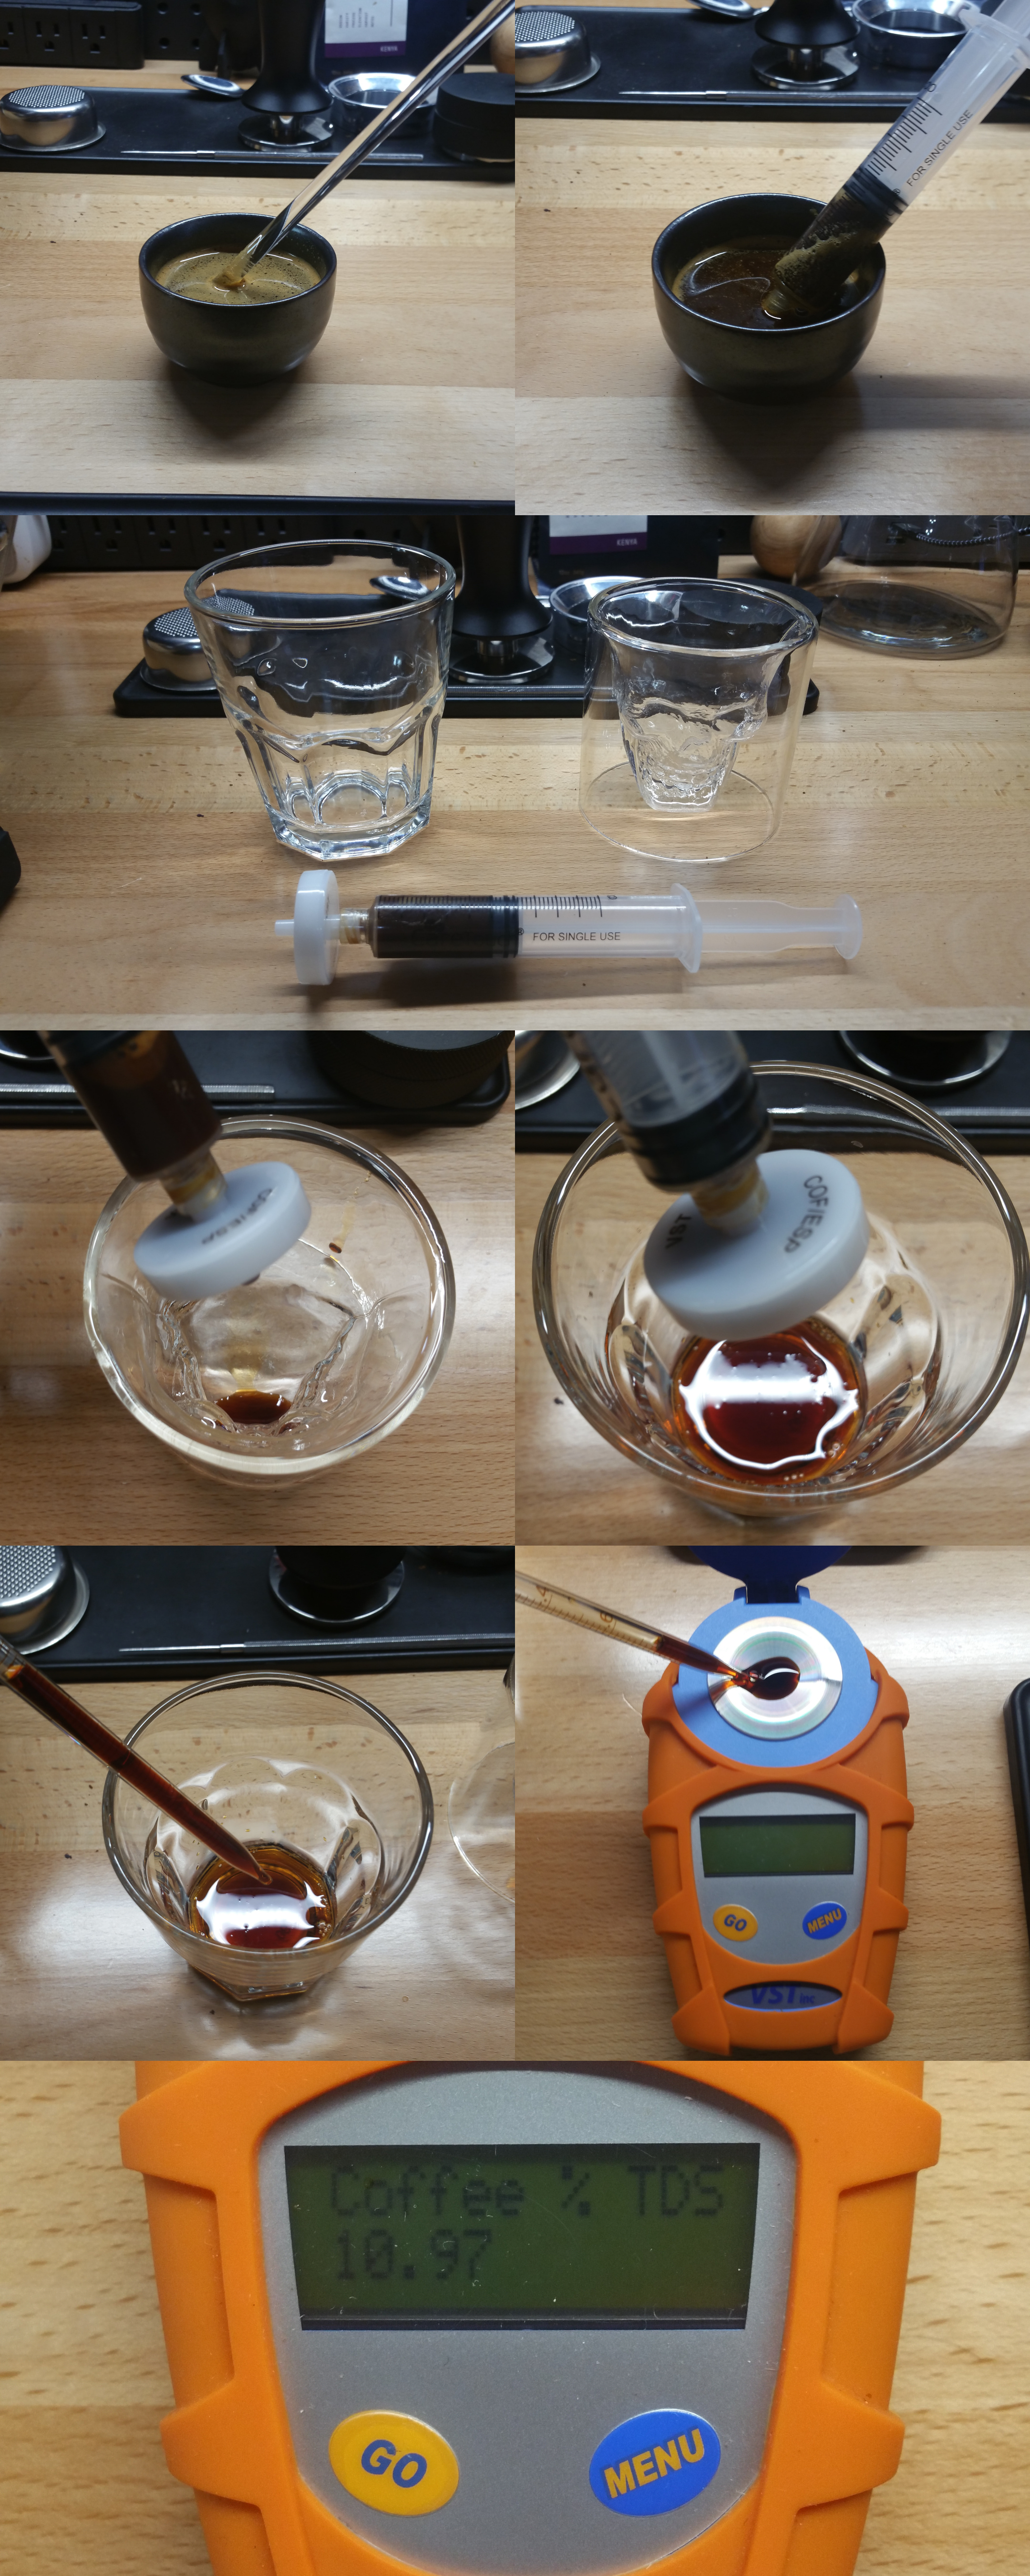
- Vigorously stir the coffee or espresso, you can use a dedicated stirring stick/spoon or the sampling instrument.
- Draw the coffee or espresso into your syringe.
- Screw the VST filter to the end of the syringe.
- Push the coffee through, discarding the first 10 droplets or so.
- The rest of the sample should be pushed into a separate cup.
- Stir the filtered coffee or espresso in the cup and pick it up with a fresh pipette.
- Push just a few drops worth of your sample onto the lens of the refractometer and close the lid. Using just a few drops lets the sample cool faster so it doesn’t take as long to get a reading. Using more doesn’t make it any more or less accurate, just makes it take longer.
- Wait ~10-20 seconds before taking your first reading in order to let the coffee cool to the temperature of the refractometer.
- Take readings until the number stays constant every time you take a new one. This can take a few tries, you want it to stay the same for 5+ readings.
- Once it’s stable, that’s your TDS. Do not take an average of several readings, the others are just the refractometer equalizing in temperature. The stable number is the one you want.
Centrifuging
Why Centrifuging?
- Effective at ensuring precise readings.
- Essentially identical in readings to industry standard VST filters.
- No ongoing costs after initial investment.
- No need for a intermediate mixing cup.
Using a Centrifuge
- Vigorously stir the coffee or espresso, you can use a dedicated stirring stick or the sampling instrument.
- Draw a sample of the coffee or espresso into a pipette.
- Push the sample into a centrifuging tube.
- Load the sample into the centrifuge, balancing it with either a “blank” tube of water or a second sample on the other side.
- Spin the centrifuge at high speed (I use 13,000rpm) for ~5 minutes.
- Draw the filtered coffee or espresso from the tube with a fresh pipette. Make sure to avoid the oil layer on top and the sediment layer on the bottom or you may get an erroneous measurement.
- Push just a few drops worth of your sample onto the lens of the refractometer and close the lid. Using just a few drops lets the sample cool faster so it doesn’t take as long to get a reading and doesn’t need an intermediate cup stage to cool it. Using more doesn’t make it any more or less accurate, just makes it take longer.
- Wait ~10-20 seconds before taking your first reading in order to let the coffee cool to the temperature of the refractometer.
- Take readings until the number stays constant every time you take a new one. This can take a few tries, you want it to stay the same for 5+ readings.
- Once it’s stable, that’s your TDS. Do not take an average of several readings, the others are just the refractometer equalizing in temperature. The stable number is the one you want.
Sampling The Slurry
When do I use this?
Sampling the slurry is done to find the concentration of the slurry at the end of the brew. You can use this to find a more accurate extraction yield than the usual assumptions. We’ll be using the last few drops rather than the slurry directly to ensure it’s a snapshot of when those drops fell, and not with more extraction that may have happened since then.
Sampling
- Collect the last few drops leaving the brewer in a separate container
- Take a sample of these drops with the same method you use for the main sample of brew TDS.
- Measure the sample as normal.
Calculating Extraction Yield
In Depth
Jonathan Gagné has a fantastic page on Measuring and Reporting Extraction Yield and another on A More Accurate Way to Calculate Average Extraction Yield that really dive into the math. I’ll just be going over the basics here.
Drip/Percolation Methods
For percolation methods, including drip coffee, espresso, and everything else where the coffee is not held in contact with the water, the equation below is used:
\(
\boxed{Exty=\frac{TDS*Brew\; Mass}{Dose}}
\)
Immersion Methods
For pure immersion methods, like French Press, cupping, and Turkish, the equation below is used:
\(
\boxed{Exty=100*(\frac{TDS}{100-TDS}*\frac{Total\; Water}{Dose})}
\)
That “100-TDS” part is to account for the fact your beverage mass is actually total water plus the dissolved solids weight.
You may sometimes see the equation approximated without that correction for beverage mass as:
\(
\boxed{Exty=\frac{TDS*Total\; Water}{Dose}}
\)
Mixed Methods / Universal
Certain methods, like Aeropress or Clever, are a bit more complicated than they let on. It’s pretty much standard to use the immersion equation here. But while it’s far more convenient, it’s also less accurate. Here’s a more realistic way with an equation from Jonathan (see the In Depth section above for links to his work on it):
\(
\boxed{Exty=100*(\frac{TDS\; Brew-TDS\; Slurry}{100-TDS\; Slurry}*\frac{Brew\; Mass}{Dose}+\frac{TDS\; Slurry}{100-TDS\; Slurry}*(\frac{Total\; Water}{Dose}-fabs)}
\)
You will need to take a sample of the last few drops separately from the sample of the main brew to get the slurry TDS. And, if you wish to be as accurate as possible, you’ll need to find your fabs, fraction of absorbed water. Which is to say the proportion of water that’s stuck inside particles unable to contribute to extraction.
This equation is actually not just for mixed methods, but a universal equation that can also be applied to pure immersion or percolation as well. If you make the same assumptions that are usually made (percolation slurry TDS = 0%, immersion slurry TDS = brew TDS, fraction of embedded water = 0) then it can simplify to be the standard equations. Although the assumptions for percolation slurry TDS and absorbed water are almost certainly false. Despite it being more accurate, I wouldn’t go calculating percolation or immersion extraction with it for the purpose of comparing with others, at least until it’s more standard.
It’s kind of unwieldily to use, so I made a calculator for it.
On VST CoffeeTools
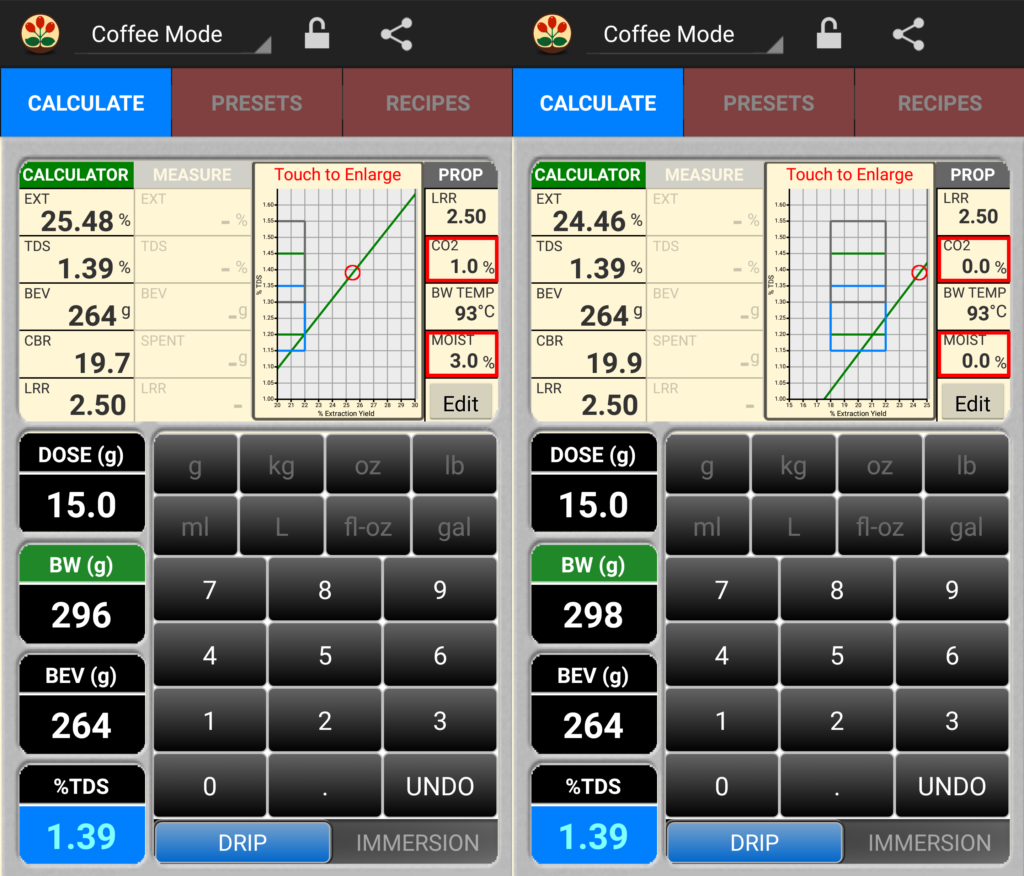
If using the VST CoffeeTools app, be sure to set your “CO2” and “MOIST” properties to 0. The default presets here add about a percent to your extraction to try to account for some things, which may or may not make it more or less accurate, but it makes your extraction yields difficult to compare with others.
Be sure to enter beverage mass directly for percolation and brew water directly for immersion. The LRR (liquid retained ratio) calculation is going to give you more potential for error than a direct measurement.
The VST app, at present, does not support the mixed / universal equation.
Cleaning
Cleaning the Refractometer
- Pipette away the liquid on the lens.
- Dab away any left behind with a small piece of paper towel.
- Wipe the lens with an alcohol pad.
- Wash the lens with distilled water.
- Dry the lens. You may need a couple squares of paper towel.
Cleaning Pipettes
You can easily clean the glass pipettes. The plastic ones are, in my experience, disposable, but some people report success cleaning them.
- Rinse the pipette from both directions until it’s fully clean.
- Push some distilled or RO water through the pipette so that no minerals from tap water dry in it.
- Dry the pipette in a toaster oven at just above boiling temperature. They take days to dry otherwise. Don’t do this if you’re trying to clean a plastic pipette.
Cleaning Syringes
- Suck water into the syringe and expel it until it’s fully clean.
- Suck distilled or RO water into the syringe and expell it so that no minerals from tap water dry in it.
- Take the syringe apart and set it out to dry.
